
solar panel installation diagram pdf
Solar panel installation diagrams provide a clear, visual guide for setting up photovoltaic systems, ensuring proper connections and component layout for safe and efficient energy generation.
1.1 Importance of Solar Panel Installation Diagrams
Solar panel installation diagrams are essential for ensuring safe, efficient, and compliant system setup; They provide a visual guide to connect components correctly, preventing installation errors; These diagrams help homeowners and installers understand the layout, wiring, and proper connections required for optimal performance. By following the diagrams, users can avoid safety hazards and ensure compliance with local electrical codes. They also serve as a reference for troubleshooting and maintenance, making them indispensable for both DIY enthusiasts and professional installers. Their clarity and precision minimize risks and maximize energy generation efficiency, ensuring a reliable solar power system.
1.2 Benefits of Using a Solar Panel Installation Diagram PDF
A solar panel installation diagram PDF offers a comprehensive, portable guide for installing photovoltaic systems. It provides detailed visuals and step-by-step instructions, making complex processes easier to understand. The PDF format ensures accessibility across devices, allowing users to reference the guide on-site. It includes diagrams for series and parallel connections, inverter setup, and grounding requirements. This resource is invaluable for planning and executing installations accurately, ensuring safety and efficiency. It also serves as a troubleshooting aid, helping users identify and resolve common issues. Overall, a PDF diagram is an essential tool for successful solar panel installations, whether for DIY projects or professional use.
Components of a Solar Panel System
Solar panels, inverters, mounting structures, batteries, and wiring are essential components. Each plays a vital role in energy generation, conversion, storage, and distribution, ensuring efficient and safe operation.
2.1 Solar Panels: Types and Specifications
Solar panels are categorized into monocrystalline, polycrystalline, and thin-film types, each offering varying efficiency levels and space requirements. Monocrystalline panels are the most efficient but also more expensive, while polycrystalline panels are cost-effective with slightly lower efficiency. Thin-film panels are flexible and suitable for unique installations but have the lowest efficiency. Specifications include wattage, voltage, and temperature coefficient, which determine performance under varying conditions. Understanding these factors helps in selecting the right panels for your system’s energy needs and installation constraints, ensuring optimal energy generation and long-term reliability. Always refer to the solar panel installation diagram PDF for precise specifications and compatibility.
2.2 Solar Inverters: Selection and Sizing
Selecting the right solar inverter is critical for system efficiency and performance. Inverters convert DC power from panels to AC for household use. When sizing, consider your system’s total wattage, voltage, and maximum power point tracking (MPPT) capabilities. String inverters are common for residential use, while microinverters offer panel-level optimization; Hybrid inverters are ideal for systems with battery storage. Proper sizing ensures optimal energy conversion and minimizes losses. Refer to the solar panel installation diagram PDF for compatibility and sizing guidelines, ensuring your inverter matches your panel array’s specifications for maximum efficiency and reliability.
2.3 Mounting Structures: Roof and Ground Mounts
Solar panel mounting structures are essential for securing panels in optimal positions. Roof mounts are the most common, using racks or trackers to angle panels for maximum sunlight capture. Ground mounts are ideal for open spaces, offering adjustability for varying sun angles. Both types require durable materials like aluminum or steel to withstand weather conditions. Proper installation ensures stability and efficiency, while leveling and alignment prevent energy loss. Refer to the solar panel installation diagram PDF for detailed guidance on selecting and installing mounts, ensuring a secure and efficient setup tailored to your location and system needs;
2.4 Batteries: Deep Cycle and Lithium-Ion Options
Batteries are crucial for storing excess energy generated by solar panels. Deep cycle batteries are traditional choices, offering reliable storage with high discharge capacity. Lithium-ion batteries, while more expensive, provide higher efficiency, longer lifespans, and lower maintenance. Both options are detailed in the solar panel installation diagram PDF, which guides selection based on energy needs and budget. Deep cycle batteries are durable but heavier, while lithium-ion units are compact and efficient. Proper installation and sizing ensure optimal performance, balancing cost and longevity. The PDF also outlines charging/discharging parameters to maximize battery life and system reliability.
2.5 Wiring and Connections: Safety and Efficiency
Proper wiring and connections are critical for ensuring the safety and efficiency of a solar panel system. The solar panel installation diagram PDF provides detailed guidance on connecting components, such as solar panels, inverters, and batteries. Key considerations include minimizing voltage drop, ensuring correct polarities, and using appropriately sized wires to handle current flow. Series and parallel connections are explained, along with their respective pros and cons. Grounding requirements are emphasized to prevent electrical shock and ensure system protection. Adhering to these guidelines helps maintain safety, efficiency, and compliance with electrical standards. The PDF also highlights best practices for securing connections and avoiding overheating risks.

Site Assessment and Planning
Evaluate your location’s solar potential, assess energy needs, and obtain permits. The solar panel installation diagram PDF guides site evaluation, system design, and compliance with local regulations.
3.1 Evaluating Your Location for Solar Suitability
Evaluating your location’s solar suitability involves assessing sunlight exposure, shading patterns, and roof or ground conditions. Ensure your site receives adequate sunlight throughout the day, ideally south-facing in the northern hemisphere. Check for obstructions like trees or buildings that could reduce efficiency. Use solar mapping tools to determine your area’s solar potential. Verify roof stability and space for panel placement. Consider local climate conditions, such as wind and snow loads, to ensure system durability. A solar panel installation diagram PDF can help visualize the optimal layout for your specific location, ensuring compliance with local building codes and maximizing energy output.
3.2 Assessing Energy Consumption and Needs
Assessing your energy consumption and needs is crucial for sizing your solar panel system correctly. Review your past electricity bills to determine your average daily energy usage, typically around 20 kWh for a standard home. Consider your energy usage patterns, such as peak demand periods and seasonal variations. Identify essential appliances and their power requirements to ensure the system meets your needs. A solar panel installation diagram PDF can guide you in aligning your energy requirements with the system’s capacity. This step ensures your solar system is tailored to your household’s demand, maximizing efficiency and cost savings while minimizing energy waste.
3.3 Obtaining Necessary Permits and Approvals
Before proceeding with solar panel installation, obtaining the necessary permits and approvals is essential for compliance with local regulations; Contact your local authorities to determine the required permits, which may include electrical and building permits. Ensure compliance with regional electrical codes and safety standards. Some areas may also require environmental assessments or homeowner association approvals. A solar panel installation diagram PDF often outlines these steps, helping you navigate the process smoothly. Working with a licensed installer can simplify securing permits, ensuring your system is legally and safely installed while meeting all regulatory requirements.

Installation Preparation
Ensure all tools, materials, and safety gear are ready. Review local electrical codes and permits. A solar panel installation diagram PDF can guide preparation effectively.
4.1 Tools and Materials Required
Installing solar panels requires specific tools and materials. Essential tools include drills, screwdrivers, wrenches, and wire strippers. Materials needed are solar panels, mounting structures, inverters, batteries, wiring, and connectors. Ensure all components are compatible and meet local electrical standards. A solar panel installation diagram PDF often lists these items, helping you prepare accurately. Safety gear like gloves and goggles is also crucial. Organize everything beforehand to streamline the installation process and avoid delays. Proper preparation ensures a safe and efficient setup, adhering to the diagram’s guidelines for a successful solar system installation.
4.2 Safety Precautions and Protective Gear
Safety is paramount during solar panel installation. Wear protective gear including gloves, safety goggles, and a harness when working at heights. Ensure the system is properly grounded to prevent electrical shocks. Use insulated tools and follow proper lockout/tagout procedures. Keep a fire extinguisher nearby. Avoid working in wet conditions or during storms. Regularly inspect equipment for damage. A solar panel installation diagram PDF often outlines these precautions to ensure compliance with safety standards. Adhering to these guidelines minimizes risks and ensures a secure installation process for both the installer and the system.
4.3 Understanding Local Electrical Codes
Understanding local electrical codes is crucial for a safe and compliant solar panel installation. These codes specify requirements for wiring, connections, and system configurations to meet national standards. A solar panel installation diagram PDF often provides visual guidance, highlighting compliant setups and key components. It typically includes detailed instructions on connecting panels, inverters, and batteries according to local regulations. Adhering to these codes ensures safe and efficient system operation, avoiding potential legal issues. Always consult local authorities or hire a licensed electrician to verify compliance, guaranteeing your installation meets all necessary standards and regulations.

Electrical Connections and Wiring
Solar panel installation diagrams detail electrical connections and wiring, ensuring safe and efficient energy flow. They guide proper setups, voltage management, and grounding for system reliability and compliance.
5.1 Series vs. Parallel Connections: Pros and Cons
Solar panel installation diagrams illustrate series and parallel connections, each with unique advantages. Series connections increase voltage while maintaining current, suitable for high-voltage systems but risking lower efficiency if one panel underperforms. Parallel connections combine currents, offering flexibility and redundancy, ideal for shading or varying orientations. Mixing configurations can optimize energy output but requires careful planning to avoid compatibility issues. Diagrams guide installers in designing systems that balance voltage, current, and efficiency, ensuring maximum energy harvest while minimizing potential faults. Proper configuration is vital for system reliability and performance, as outlined in detailed solar panel installation diagrams.
5.2 Connecting Solar Panels to the Inverter
Connecting solar panels to the inverter requires careful attention to voltage and current matching. Series connections increase voltage, while parallel connections boost current. The configuration must align with the inverter’s input specifications to ensure optimal energy transfer. Solar panel installation diagrams provide detailed wiring layouts to prevent mismatches. Proper connections ensure maximum efficiency and safety, while incorrect configurations can lead to system damage or reduced performance. Always follow the manufacturer’s guidelines and use compatible connectors to maintain system integrity and compliance with electrical standards. Correct connections are vital for harnessing solar energy efficiently and reliably.
5.3 Hooking Up the Inverter to the Electrical Panel
Connecting the inverter to the electrical panel is a critical step, ensuring the solar system integrates with the home’s electrical grid. A dedicated circuit breaker is typically installed in the main panel to manage the inverter’s output. Proper grounding and bonding are essential for safety, as specified in electrical codes. Solar panel installation diagrams detail the correct wiring and connections to prevent overload or malfunction. The inverter’s output must match the panel’s capacity, and a net meter is often installed to monitor energy flow. Always ensure compliance with local regulations and use certified components for a safe and efficient connection.
5.4 Grounding and Bonding Requirements
Proper grounding and bonding are essential for the safe operation of a solar panel system. The system must be grounded to ensure electrical currents have a safe path to the earth, preventing shocks and fires. A ground spike with a resistance of less than 10 ohms is typically required, and multiple spikes may be needed for larger systems. All components, including inverters and mounting structures, must be bonded to the grounding system. Solar panel installation diagrams detail the correct methods for grounding and bonding, ensuring compliance with electrical codes and standards for safety and efficiency.

Mounting and Securing Solar Panels
Solar panels must be securely mounted on roofs or ground to withstand weather conditions. Proper mounting ensures optimal tilt and orientation for maximum energy production and system longevity.
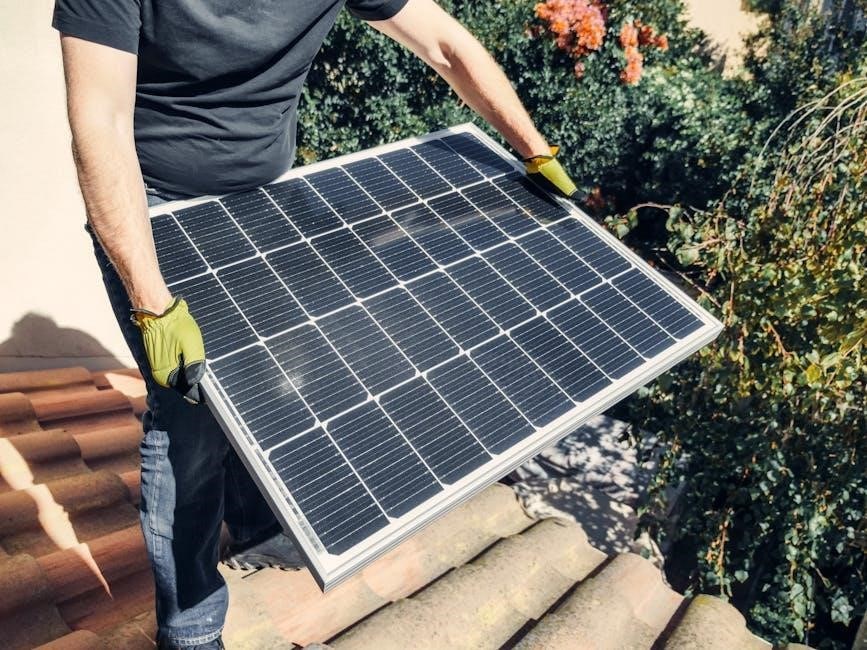
6.1 Roof Mount Installation: Step-by-Step Guide
Begin by assessing your roof’s structural integrity and determining the optimal layout using a solar panel installation diagram. Mark the installation area and drill pilot holes for anchors. Secure roof anchors firmly, ensuring they are watertight and evenly spaced. Attach mounting rails to the anchors, aligning them with your system’s design. Carefully lift and place solar panels onto the rails, securing them with clamps. Tighten all connections and seal any gaps to prevent leaks. Finally, test the system’s stability and ensure all components are safely and efficiently installed. Always follow safety guidelines and consult a professional if uncertain.
6.2 Ground Mount Installation: Best Practices
Ground mount installations offer flexibility for solar panel placement, especially on open land. Begin by assessing the site for sunlight exposure and drainage. Use a solar panel installation diagram to plan the layout and spacing. Dig trenches for footings and pour concrete for a stable base. Assemble the mounting structure, ensuring it is level and secure. Attach solar panels to the rails, adjusting angles for maximum efficiency. Connect all components following electrical codes and test the system. Regularly inspect the setup to prevent corrosion and ensure optimal performance. Ground mounts require careful planning but provide reliable energy generation. Safety and durability are key priorities.
6.3 Adjusting Panel Angles for Optimal Efficiency
Adjusting solar panel angles enhances energy production by aligning panels with the sun’s elevation. Latitude and seasonal changes influence optimal tilt, with lower angles in summer and steeper in winter. Use solar panel installation diagrams to determine specific tilts for your location. While some systems use trackers for automatic adjustment, manual adjustments are often sufficient and cost-effective. Ensure structural stability when changing angles to maintain safety. Regular monitoring and adjustments based on seasonal variations can maximize efficiency, making it a worthwhile effort for improved energy output.
Testing and Commissioning
Testing and commissioning involve verifying system performance, ensuring proper voltage and current flow, and conducting safety inspections to guarantee a fully functional and safe solar panel installation.
7.1 Initial System Check and Testing
The initial system check ensures all components are properly connected and functioning. Verify voltage, current, and power output using a multimeter, and ensure smart meters accurately track energy flow. Check grounding systems, ensuring earth spike resistance is below 10 ohms for safety. Review the solar panel installation diagram to confirm connections match the design. Test inverters, batteries, and panels for optimal performance. Ensure no short circuits or open circuits exist. This step guarantees the system operates efficiently and safely before full commissioning, aligning with electrical codes and installation standards.
7.2 Ensuring Proper Voltage and Current Flow
Measuring voltage, current, and power is crucial for system performance. Use a multimeter to verify voltage between the inverter’s input and output terminals. Check current flow through each string to ensure it matches the expected values. Test under both load and no-load conditions to confirm stability. Ensure the inverter operates within its voltage and current limits for efficiency and safety. Refer to the solar panel installation diagram to verify connections and polarities. Proper voltage and current flow guarantee optimal energy generation and prevent potential system damage or inefficiencies. Regular checks ensure the system performs as designed.
7.3 Final Safety Inspections and Approvals
Final safety inspections ensure the solar panel system meets all safety and regulatory standards. Verify grounding and bonding connections, ensuring earth spike resistance is below 10 ohms. Inspect all electrical connections for integrity and compliance with local codes. Check the inverter’s operation, ensuring proper voltage and current flow. Confirm that the system is free from short circuits or open circuits. Obtain approval from local authorities or certified professionals before commissioning. Regular follow-ups are recommended to maintain safety and efficiency. Proper documentation and approval ensure a safe and reliable solar power system for long-term use.

Maintenance and Troubleshooting
Regular maintenance ensures optimal performance. Clean panels, inspect wiring, and check for loose connections. Troubleshoot common issues like shading or inverter faults using installation diagrams for guidance.
8.1 Regular Maintenance Tasks
Regular maintenance ensures your solar system operates efficiently. Clean solar panels to remove dirt and debris, which can reduce energy output. Inspect wiring for loose connections or damage, and check inverters for proper function. Use installation diagrams to verify all components are correctly connected. Monitor energy production to detect potential issues early. Trim vegetation around panels to prevent shading. Inspect mounting structures for stability and integrity. Schedule seasonal checks to address weather-related wear. Ensure grounding systems are secure for safety. Regular upkeep extends system lifespan and maximizes energy generation.
8.2 Common Issues and Troubleshooting Tips
Common solar system issues include reduced efficiency, inverter faults, and connectivity problems. Check for loose wiring or damaged panels, as these can disrupt energy flow. Use installation diagrams to verify connections. If the inverter displays error codes, consult the manual or contact a technician. Monitor for shading issues, as they can significantly lower output. For ground fault alerts, inspect the system for improper grounding. Regularly review performance data to identify trends. Troubleshooting often involves resetting inverters or cleaning panels. Always refer to the installation diagram for guidance on resolving specific issues efficiently and safely.
8.3 Upgrading or Expanding Your System
Upgrading or expanding your solar system involves assessing energy needs, budget, and system compatibility. Evaluate if additional panels, inverters, or batteries are required. Ensure new components match existing specifications to maintain efficiency. Refer to the installation diagram to identify potential upgrade points. Check local codes and permits for compliance. Hiring a professional is recommended for complex modifications. Plan for future energy demands by designing a scalable system. Use the installation diagram to visualize and execute upgrades seamlessly, ensuring optimal performance and safety. Regularly review and update your system to maximize energy savings and adapt to new technologies.
Related Posts

cfa level 1 book 1 pdf
Struggling with CFA Level 1? Get your Book 1 PDF now and unlock expert insights! We provide a clear path to success for Canadian candidates. Start studying smarter today!

think history textbook grade 10 pdf
Need a Grade 10 Canadian History textbook PDF? 3D Tapestry offers easy access to learning resources! Download & explore Canada’s past today. History textbook.

whirlpool gold dehumidifier user manual
Get the Whirlpool Gold Dehumidifier user manual for easy setup and maintenance. Find troubleshooting tips and expert support here.