
needlepoint stitch guides
Needlepoint stitch guides are essential resources for embroiderers, offering clear patterns and instructions to create beautiful designs. They help enhance stitching skills, from basic to advanced levels, ensuring precise and professional results.
1.1 Definition and Purpose of Needlepoint Stitch Guides
Needlepoint stitch guides are instructional resources that provide detailed step-by-step instructions for creating various stitches. They serve as visual and written references, helping embroiderers understand stitch techniques, patterns, and thread placement. These guides are designed to enhance creativity and precision, making it easier for crafters to achieve professional-quality results. Whether for beginners or experienced stitchers, needlepoint guides organize stitches and offer practical tips to master embroidery projects effectively.
1.2 Importance of Stitch Guides in Needlepoint
Stitch guides are invaluable tools for needlepoint enthusiasts, offering clear instructions and patterns. They ensure consistency in stitching, helping crafters achieve professional-looking results. Guides also save time by providing step-by-step directions, reducing trial and error. For beginners, they simplify learning, while experienced stitchers can explore advanced techniques confidently. These resources act as a reliable reference, ensuring every stitch is executed correctly and enhancing the overall quality of needlepoint projects.
1.3 Brief History of Needlepoint Stitch Guides
Needlepoint stitch guides have evolved from traditional embroidery patterns, dating back centuries. Early guides were often handwritten or illustrated in craft books. The 20th century saw the rise of standardized stitching systems, making needlepoint more accessible. Modern guides incorporate digital diagrams and step-by-step tutorials, reflecting advancements in design and teaching methods. These resources have become indispensable, preserving techniques while inspiring creativity. Their development mirrors the growth of needlepoint as a popular craft, catering to both beginners and skilled artisans.
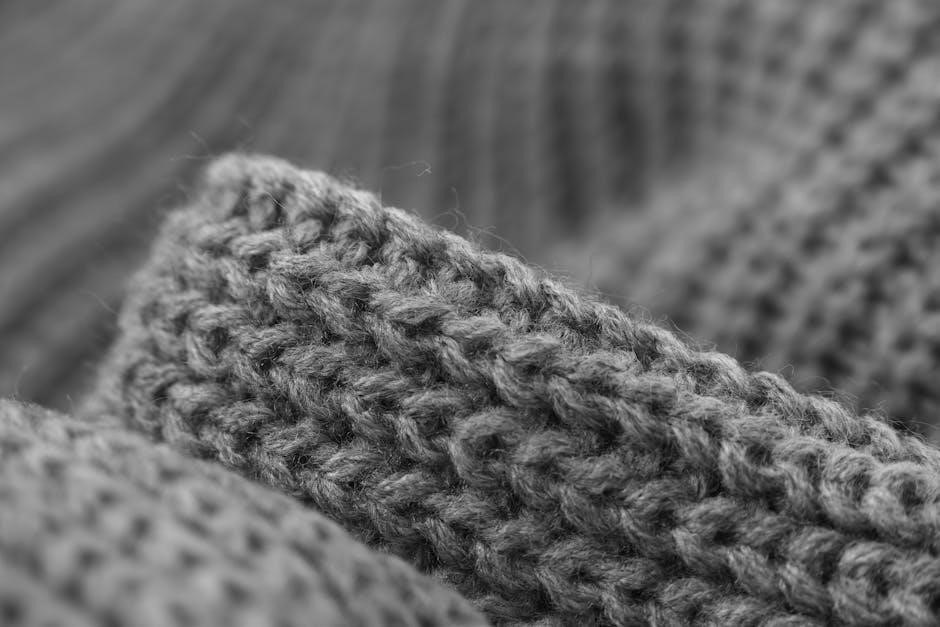
Basic Needlepoint Stitches
Needlepoint basics include essential stitches like the Straight Stitch, Basketweave, Continental, and Tent Stitch. These foundational techniques are vital for creating smooth, even fabric. They form the basis for more complex designs, making them perfect for beginners to master.
2.1 The Straight Stitch
The Straight Stitch is the simplest and most versatile stitch in needlepoint. It involves inserting the needle directly in and out of the canvas in a straight line. This stitch is ideal for outlining designs, creating details, and filling large areas. It works well with various threads and yarns, making it perfect for both beginners and experienced stitchers. The Straight Stitch is easy to learn but requires attention to maintain evenness and avoid puckering. It’s a fundamental technique that lays the groundwork for more complex stitches.
2.2 The Basketweave Stitch
The Basketweave Stitch is a popular needlepoint technique that creates a textured, woven appearance. It involves stitching in a diagonal pattern, alternating the direction of the stitches to form a basket-like design. This stitch is excellent for covering large areas and adds depth to projects. It is also versatile, working well with both thin and thick yarns. The Basketweave Stitch is easy to master and provides a sturdy foundation for more complex designs. Proper tension is key to maintaining its even, fabric-like texture.
2.3 The Continental Stitch
The Continental Stitch is a versatile and widely used needlepoint stitch. It is a straight-stitch variation, worked in a single direction, making it ideal for detailed areas and fine lines; This stitch is particularly effective for creating texture and definition in designs. It works well with various yarns, from thin floss to thicker threads, and is often used in combination with other stitches for added dimension. The Continental Stitch is easy to learn and adaptable, making it a favorite among needlepoint enthusiasts for both small and large-scale projects.
2.4 The Tent Stitch
The Tent Stitch is a basic needlepoint stitch that creates a smooth, fabric-like texture. It is worked by inserting the needle in one direction and bringing it up in the opposite, forming a small diagonal stitch. This stitch is ideal for backgrounds, large areas, and projects requiring quick coverage. The Tent Stitch is reversible and works well in horizontal, vertical, or diagonal directions. It is a great stitch for beginners and is often used to create subtle texture and depth in needlepoint designs. Its simplicity makes it versatile for various applications.
Advanced Needlepoint Stitches
Advanced needlepoint stitches, like the Parisian, Mosaic, and Nobuko stitches, create intricate designs with multi-directional threads, adding dimension and texture to projects. They require precision and practice to master, offering complex, visually appealing results;
3.1 The Parisian Stitch
The Parisian Stitch is a sophisticated needlepoint technique that involves working stitches in multiple directions to create a textured, three-dimensional effect. It is often used to fill large areas or create intricate backgrounds. This stitch is particularly effective for adding depth and visual interest to designs. To execute the Parisian Stitch, embroiderers typically work in a series of diagonal lines, alternating the direction of the stitches to achieve the desired pattern. It is ideal for projects requiring a raised, fabric-like appearance and works beautifully with specialized threads or yarns. While it requires precision and control, the Parisian Stitch offers rewarding results for advanced needlepoint enthusiasts. Using a tapestry needle and maintaining consistent tension are key to mastering this stitch.
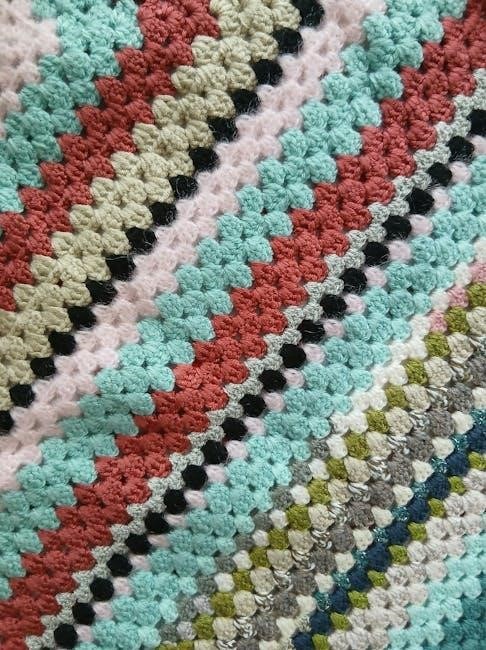
3.2 The Mosaic Stitch
The Mosaic Stitch is a striking needlepoint technique that creates vibrant, geometric patterns by working multiple straight stitches in a specific sequence. Similar to Bargello, it relies on alternating stitch directions to form a textured, mosaic-like effect. This stitch is ideal for creating dynamic backgrounds or borders and works well with a variety of thread types. Its simplicity makes it accessible to embroiderers of all skill levels, while its versatility allows for modern and intricate designs. Using contrasting colors and carefully planned patterns, the Mosaic Stitch adds depth and visual interest to any needlepoint project.
3.3 The Nobuko Stitch
The Nobuko Stitch is a versatile and textured needlepoint stitch originating from Japan. It combines slanted and straight stitches to create a unique, dimensional effect. This stitch is perfect for adding intricate patterns and depth to designs. It works well for both foreground motifs and background fills, making it a favorite for creating dynamic, modern needlepoint pieces. The Nobuko Stitch is adaptable to various yarn types and colors, allowing embroiderers to experiment with different visual effects. Its complexity makes it ideal for intermediate to advanced stitchers seeking a challenge.
3.4 The Scotch Stitch
The Scotch Stitch is a traditional needlepoint stitch known for its textured, grid-like pattern. It involves working diagonal stitches in a specific sequence, creating a strong, geometric design. This stitch is ideal for filling large areas and adding depth to a piece. It works well for both modern and classic designs, offering a versatile option for embroiderers. The Scotch Stitch is moderately complex, making it suitable for intermediate stitchers. Its uniform texture makes it a great choice for backgrounds or focal points in needlepoint projects.
Tools and Materials for Needlepoint
Essential tools include a tapestry needle, scissors, and a sturdy canvas. High-quality threads and yarns are vital for durability and color vibrancy in needlepoint projects.
4.1 Choosing the Right Needle
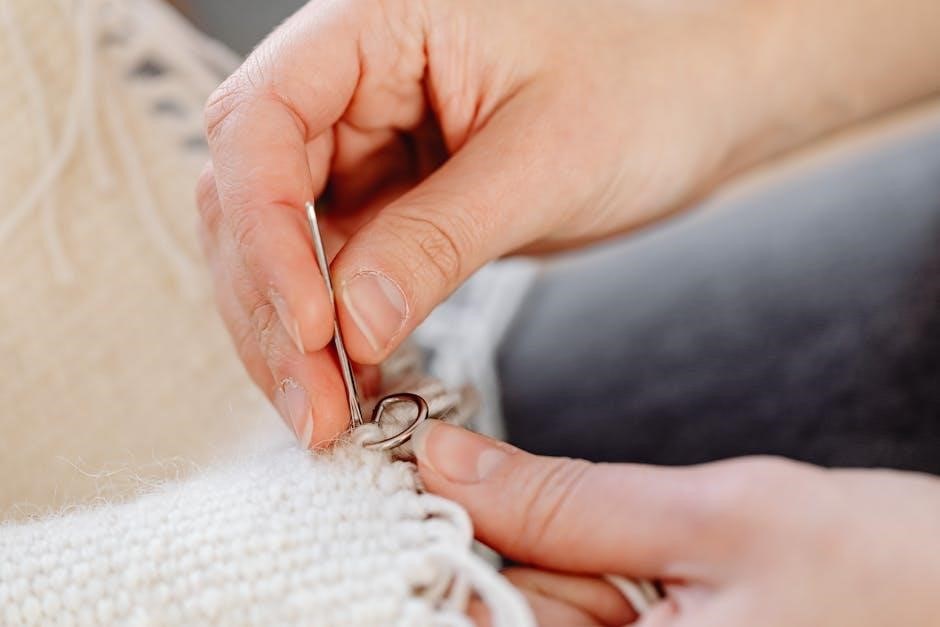
Selecting the right needle is crucial for needlepoint. A tapestry needle is ideal due to its blunt tip and large eye, making it easy to thread and maneuver through canvas. The length and thickness should match the project’s complexity. Thinner needles are better for detailed work, while thicker ones suit heavier yarns. Always opt for high-quality, durable needles to ensure smooth stitching and prevent damage to the canvas or thread. Proper needle selection enhances stitching comfort and overall project quality.
4.2 Selecting Appropriate Thread and Yarn
Choosing the right thread and yarn is vital for needlepoint success. Wool, silk, and cotton are popular choices, each offering unique textures and durability. Consider the project’s complexity and desired finish when selecting yarn weight and fiber type. Color selection should align with the design, ensuring vibrancy and consistency. Always test yarn samples on the canvas to gauge coverage and texture. High-quality threads ensure lasting results and a professional finish. Proper yarn selection enhances both the stitching experience and the final piece’s appeal.
4.3 Understanding Canvas Types
Canvas selection is crucial for needlepoint projects. Mono Canvas is the most common, offering durability and even stitching. Penelope Canvas features double threads for easier stitching, while Interlock Canvas is stiff and ideal for framing. Canvas types vary in mesh size and material, affecting stitch visibility and ease. Choose canvas based on project complexity and desired texture. Proper canvas selection ensures a smooth stitching experience and professional-looking results. Always test canvas samples to determine the best fit for your design and skill level.
4.4 Essential Accessories for Needlepoint
Essential accessories for needlepoint include good lighting, such as magnifying lamps, to enhance stitch visibility. Thread cutters or small scissors are handy for managing yarn. Storage boxes or organizers keep supplies tidy, while stitch markers help track patterns. A measuring tape or ruler ensures accurate project sizing. Optional tools like embroidery hoops or stitch guides can aid in maintaining even tension. These accessories streamline the stitching process, making it more efficient and enjoyable for crafters of all skill levels.
Step-by-Step Guide to Using Stitch Guides
Learn to follow patterns and diagrams with ease, mastering various stitches to enhance your needlepoint projects. This guide offers practical tips for all skill levels, ensuring success.
5.1 Reading and Interpreting Stitch Guides
Stitch guides provide detailed instructions for creating needlepoint designs. They often include diagrams, symbols, and step-by-step directions. To interpret them effectively, start by understanding the key symbols and abbreviations used. Pay attention to thread color codes and stitch directions. Practice on scrap canvas to master the patterns before working on your final project. Many guides also offer tips for maintaining even tension and avoiding common mistakes. By carefully following these instructions, you can achieve professional-looking results and enhance your needlepoint skills.
5.2 Following Patterns and Diagrams
Following patterns and diagrams in stitch guides requires careful attention to detail. Start by aligning the pattern with your canvas, ensuring proper orientation. Count threads to maintain accuracy and avoid misalignment. Use the diagrams to guide stitch placement and direction. Pay attention to symbols and color codes for thread changes. Practice on scrap canvas to refine techniques. Managing thread cuts and maintaining even tension ensures a polished finish. Consistency in stitch orientation is key for a professional appearance. By methodically following patterns, you can achieve precise and visually appealing needlepoint designs.
5.3 Troubleshooting Common Mistakes
Common mistakes in needlepoint include incorrect thread cuts, uneven tension, and reverse stitches. To fix, cut threads diagonally for smooth ends and adjust tension by gently tugging. Reverse stitches can be corrected by reworking them with a tapestry needle; Regularly inspect your work to catch errors early. Use stitch guides to ensure accuracy and maintain consistency. Proper tool selection, like sharp scissors, prevents thread fraying. By addressing mistakes promptly, you can achieve a polished and professional finish in your needlepoint projects.
Tips for Mastering Needlepoint Stitches
Mastering needlepoint stitches requires consistent practice and attention to detail. Use high-quality tools, maintain even tension, and keep threads organized. Regularly review your work to ensure symmetry and balance.
6.1 Maintaining Tension and Evenness
Maintaining even tension is crucial for professional-looking needlepoint. Too loose, and stitches may pucker; too tight, and fabric distorts. Use a sturdy canvas and high-quality needles to ensure consistency. Always keep the fabric taut but not overly stretched. Pay attention to thread length—long threads can cause uneven tension. If stitches become uneven, gently adjust them before moving forward. Practice on scrap canvas to develop a steady hand. Even tension ensures a smooth, polished finish, making your needlepoint truly stand out.
6.2 Managing Thread Tails and Ends
Managing thread tails and ends is key to maintaining a neat and professional needlepoint project. Always secure loose ends by weaving them into the stitching or using small anchor stitches. Avoid leaving long tails, as they can tangle or unravel. Keep the working thread length manageable to prevent knots. For added security, thread ends can be sealed with a dab of fabric adhesive. Proper management ensures a clean finish and prevents loose threads from compromising your design. This step is essential for both durability and aesthetics.
6.3 Achieving Symmetry and Balance
Achieving symmetry and balance in needlepoint is crucial for a visually appealing design. Start by planning your pattern, ensuring even distribution of stitches and motifs. Use a center point as a reference to maintain balance. When stitching, work symmetrically from the center outward to avoid mismatches. Regularly check your progress to ensure alignment and adjust as needed. Proper thread tension and even stitching also contribute to a balanced finish. Symmetry and balance are key to creating professional-looking needlepoint pieces that are both harmonious and visually striking. This attention to detail elevates your work to the next level.
Popular Needlepoint Projects
Popular needlepoint projects include belts, handbags, and home decor items. These projects are ideal for showcasing stitching skills and creating functional, personalized pieces. They appeal to all skill levels, blending creativity with practicality.
7.1 Beginner-Friendly Projects
Beginner-friendly needlepoint projects are designed to be simple and rewarding. Coasters, ornaments, and small decorative items are ideal for mastering basic stitches. These projects require minimal materials and time, making them perfect for practicing techniques. They also allow for experimentation with colors and patterns. Completing these small works builds confidence and skill, providing a sense of accomplishment. They are a great way to start your needlepoint journey, offering a foundation for more complex designs in the future.
7.2 Intermediate and Advanced Projects
Intermediate and advanced needlepoint projects offer a wide range of creative possibilities, from detailed pillow covers to intricate wall hangings. These projects often involve complex stitching techniques, such as the Parisian or Mosaic stitch, and require a higher level of skill and patience. They are perfect for those looking to challenge themselves and refine their craftsmanship. Advanced projects may include larger-scale designs, like elaborate landscapes or geometric patterns, and often incorporate multiple colors and materials. These endeavors allow needlepoint enthusiasts to showcase their mastery and artistic expression, resulting in stunning, professional-grade pieces.
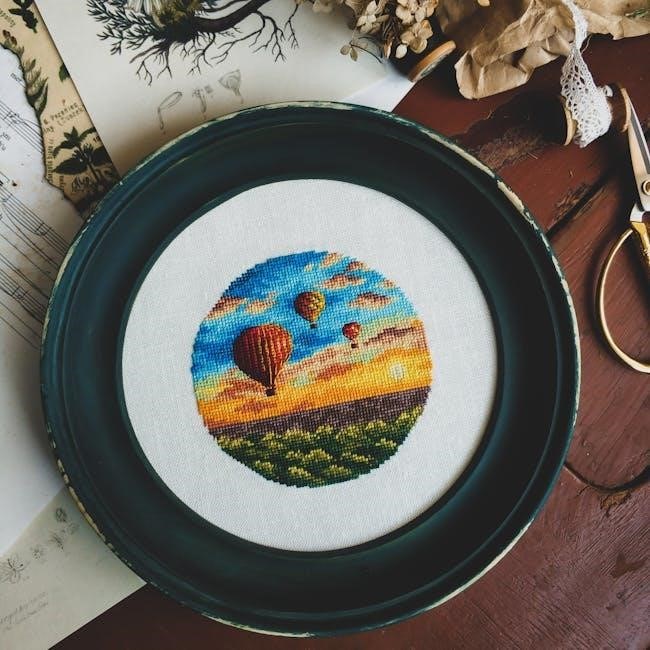
7.3 Seasonal and Themed Designs
Seasonal and themed needlepoint designs add variety and charm to projects, allowing creators to celebrate holidays, events, or personal interests. From festive holiday ornaments to summer-themed beach scenes, these designs cater to diverse tastes. They often incorporate vibrant colors and symbolic motifs, making them perfect for gifts or home decor. Themed projects, such as wedding motifs or wildlife patterns, enable stitchers to express their creativity and commemorate special occasions. These designs are ideal for both personal enjoyment and as thoughtful, customized gifts for loved ones.
Resources for Needlepoint Enthusiasts
Explore books, online forums, and workshops for mastering needlepoint. The Needlework System 4 and Pinterest offer inspiration and practical tools for enhancing your stitching journey and creativity.
8.1 Recommended Books and Guides
Discover essential resources like “The Needlework System 4” and other comprehensive guides. These books offer inspiration, technical guidance, and creative tips for needlepoint enthusiasts. They cover basic stitches to advanced techniques, providing clear instructions and diagrams. Many guides focus on material selection, troubleshooting, and project planning, making them invaluable for both beginners and experienced stitchers. These resources help enhance your skills and bring your designs to life with precision and artistry, catering to all levels of needlepoint expertise.
8.2 Online Communities and Forums
Online communities and forums are vibrant hubs for needlepoint enthusiasts. Platforms like Facebook groups, Reddit forums, and specialized stitching communities offer shared tips, pattern exchanges, and troubleshooting advice. These spaces foster collaboration and inspiration, helping stitchers refine their skills. While some express frustration with platforms like Pinterest due to pattern organization issues, they remain valuable for visual inspiration. Engaging with these communities can enhance your needlepoint journey by connecting with fellow enthusiasts and gaining insights from experienced stitchers.
8.3 Workshops and Classes
Workshops and classes are valuable resources for mastering needlepoint techniques. They offer hands-on instruction from experienced instructors, tailored to various skill levels. These sessions provide personalized feedback and the opportunity to learn intricate stitches in a supportive environment. Many classes cover topics like canvas selection, thread management, and advanced stitching methods, helping participants build confidence and refine their craft. Whether in-person or online, these educational opportunities foster a sense of community among stitchers, making them an ideal way to enhance your needlepoint skills.
Maintenance and Care of Needlepoint Work
Proper care ensures the longevity of needlepoint pieces. Regular cleaning, storage in protective covers, and gentle handling preserve stitching quality and maintain vibrant thread colors over time.
9.1 Cleaning and Preserving Finished Pieces
Cleaning and preserving needlepoint work requires care to maintain its quality. Gently remove dirt with a soft brush or vacuum on a low setting. Avoid harsh chemicals or soaking, as this can damage threads or canvas. For spot cleaning, use a damp cloth with mild soap, blotting carefully. Store finished pieces in a cool, dry place, away from direct sunlight to prevent fading. Use acid-free materials or protective covers to safeguard against dust and moisture. Professional cleaning should be considered for delicate or antique pieces to ensure longevity.
9.2 Storing Needlepoint Projects
Proper storage is crucial to preserve needlepoint projects. Use acid-free materials like tissue paper or cloth to wrap finished pieces. Store them in airtight containers or sealed bags to protect from dust and moisture. Avoid direct sunlight, as it can cause fading. For large or framed pieces, consider using archival-quality boxes. Never fold needlepoint; instead, roll it gently around a sturdy tube. Keep projects in a cool, dry environment to prevent damage. Handling with clean hands or gloves can also help maintain their condition over time.
9.4 Repairing Damaged Stitches
Repairing damaged needlepoint stitches requires patience and precision. Inspect the damage carefully and identify the affected areas. Use a tapestry needle and matching thread to re-stitch damaged sections. Gently remove loose or frayed threads without pulling too hard. Re-create the original stitches, ensuring tension matches the surrounding fabric. For severe damage, consult a professional or use repair guides. Regular maintenance can prevent further damage, extending the life of your needlepoint piece. Always work in a well-lit area to ensure accuracy and preserve the integrity of your design.
Related Posts

san diego tour guide
Discover San Diego’s hidden gems, local favorites, and top attractions with our expert tour guide. Plan your perfect trip today!
guide to lava lamps
Discover the hypnotic beauty of lava lamps. Explore their history, designs, and how they can elevate your home decor with a retro vibe.

k-swap guide pdf
Discover the ultimate K-swap guide PDF! Learn easy installation, expert tips, and boost your engine’s performance. Download now!